前言 公司最近准备建 node 中间层,可考虑的方案就 express koa nest egg ,express 和 koa 都太轻了,给企业用不合适,nest 中文文档太少,开发中如果出现问题,查找相关解决方案并不容易,所以最后可选的也就 eggJs 了。eggjs 是阿里出品的企业级 node 框架,奉行 约定优于配置 ,一切基于约定开发,减少团队沟通成本,另一个比较重要的点是 egg 拥有完善的日志系统,对于 bug 定位等及其方便。本文就记录下采用 eggjs 开发中遇到的一些问题。
怎么获取前端传入的参数 根据官方文档,npm init egg --type=simple 后,项目内会有个 app 文件夹,内容如下:
1
2
3
4
├── app │ ├── controller │ │ └── home.js │ └── router.js
打开 router.js 代码如下:
1
2
3
4
module .exports = app => const { router, controller } = app; router.get ('/' , controller.home .index ); };
很容猜到,访问 / 接口时,去执行 controller 文件夹下 home.js 文件的 index 方法了,并且/ 接口是个 GET 请求。
打开 home.js 文件,代码如下:
1
2
3
4
5
6
7
8
9
10
const Controller = require ('egg' ).Controller ;class HomeController extends Controller { async index ( const { ctx } = this ; ctx.body = 'hi, egg' ; } } module .exports = HomeController ;
可以看到 index 方法从 this 中解构出了一个 ctx ,ctx 就是这次请求的上下文,给 ctx.body 赋值了一个 hi, egg ,把项目 npm run dev 跑起来,访问 http://localhost:7001 可以看到页面显示 he, egg ,所以可知 ctx.body 即是给客户端返回的信息。那么前端传入的参数肯定也在这个请求上下文上,请求方式我们常用的有 GET 和 POST ,GET 请求的参数我们可以通过 ctx.query 获取到,POST 请求需要做些其他操作,稍后再讲;同时还有个路径参数,例如 /1 取这个 1 的路径参数可以使用 ctx.params 。
get请求 使用API : ctx.query
当我们访问 http://localhost:7001?id=101 ,我们可以把参数在 Controller 打印出来
官方文档: https://eggjs.org/zh-cn/basics/controller.html#query
1
2
3
4
5
6
7
8
9
10
11
12
const Controller = require ('egg' ).Controller ;class HomeController extends Controller { async index ( const { ctx } = this ; const {query} = ctx; console .log (query); ctx.body = 'hi, egg' ; } } module .exports = HomeController ;
在控制台我们可以看待输出了一个对象,id 是 123
获取路径参数 使用API : ctx.params
对于路径参数我们需要在定义路由的时候添加上对应的定义
1 2 3 4 5 module .exports = app => const { router, controller } = app; router.get ('/:id' , controller.home .index ); };
然后当我们访问 http://localhost:7001/123 的时候,可以通过 ctx.params 将入参打印出来。
官方文档: https://eggjs.org/zh-cn/basics/controller.html#router-params
1
2
3
4
5
6
7
8
9
10
11
12
const Controller = require ('egg' ).Controller ;class HomeController extends Controller { async index ( const { ctx } = this ; const {params} = ctx; console .log (params); ctx.body = 'hi, egg' ; } } module .exports = HomeController ;
当访问的时候可以在控制台看到输出,不贴图了
POST 请求报错 使用 GET 请求的时候一切正常,但是当我们定义一个 POST 请求后,会发现控制台报了个 CSRF 的错,错误内容如下:
1
2
3
4
5
6
7
8
9
10
11
12
13
14
15
# 控制台错误内容 2020-04-07 17:31:24,844 WARN 10854 [-/::1/-/48ms POST /post] missing csrf token. See https://eggjs.org/zh-cn/core/security.html#安全威胁csrf的防范 2020-04-07 17:31:24,855 WARN 10854 [-/::1/-/55ms POST /post] nodejs.ForbiddenError: missing csrf token at Object.throw (/Users/mac/Documents/newWork/node-Middleware/node_modules/koa/lib/context.js:97:11) at Object.assertCsrf (/Users/mac/Documents/newWork/node-Middleware/node_modules/egg-security/app/extend/context.js:153:19) at csrf (/Users/mac/Documents/newWork/node-Middleware/node_modules/egg-security/lib/middlewares/csrf.js:33:9) at dispatch (/Users/mac/Documents/newWork/node-Middleware/node_modules/egg-security/node_modules/koa-compose/index.js:42:32) at /Users/mac/Documents/newWork/node-Middleware/node_modules/egg-security/node_modules/koa-compose/index.js:34:12 at dispatch (/Users/mac/Documents/newWork/node-Middleware/node_modules/koa/node_modules/koa-compose/index.js:42:32) at session (/Users/mac/Documents/newWork/node-Middleware/node_modules/koa-session/index.js:41:13) at dispatch (/Users/mac/Documents/newWork/node-Middleware/node_modules/koa/node_modules/koa-compose/index.js:42:32) at overrideMethod (/Users/mac/Documents/newWork/node-Middleware/node_modules/koa-override/index.js:38:12) at dispatch (/Users/mac/Documents/newWork/node-Middleware/node_modules/koa/node_modules/koa-compose/index.js:42:32) message: "missing csrf token" pid: 10854
这个报错是因为官方内置的 egg-security 插件默认对所有『非安全』的方法,例如 POST,PUT,DELETE 都进行 CSRF 校验,当我们请求时,服务器会通过 Cookie 下发一个 token ,要求我们发起请求的时候,将这个 token 放置到 query、body 或者 header 中发送给服务端。
但实际开发中我们这个接口并不一定是只给 Web 用,对于非浏览器客户端,Cookie 是下发不成功的,另外对于 token 更希望由我们自己实现,而不是由框架处理,所以,我们需要关闭 egg-security 的 CSRF 验证
项目创建后,项目下会有个 config 文件夹,文件夹内文件如下:
1
2
3
├── config │ ├── config.default.js │ └── plugin.js
config.default.js 是应用配置文件,plugin.js 是插件的配置文件,我们要关闭的 egg-security 就需要在 config.default.js 中进行,打开 config.default.js 文件,内容如下(去掉注释后):
1
2
3
4
5
6
7
8
9
10
11
12
13
14
15
16
'use strict' ;module .exports = appInfo => const config = exports = {}; config.keys = appInfo.name + '_1586250824909_3576' ; config.middleware = []; const userConfig = {}; return { ...config, ...userConfig, }; };
可以看到这个文件导出了一个函数,而这个函数返回了一个对象,关闭 egg-security 在这个对象中配置配置即可,添加如下内容:
1
2
3
4
5
6
7
8
9
10
11
12
13
14
15
16
17
18
19
20
'use strict' ;module .exports = appInfo => const config = exports = {}; config.keys = appInfo.name + '_1586250824909_3576' ; config.middleware = []; const userConfig = {}; return { ...config, ...userConfig, security : { csrf : { enable : false , }, }, }; };
关闭之后重启项目,即可;
参考文档:
官方文档: 为什么会有-csrf-报错
官方文档: 安全威胁-csrf-的防范
怎么获取 POST 请求的参数 使用API : ctx.request.body
POST 请求的参数同样可以在 controller 中打印,接收用的是 ctx.request.body
我们先在 router.js 中定义一个 POST 请求接口
1 2 3 4 5 module .exports = app => const { router, controller } = app; router.post ('/post' , controller.home .post ); };
然后在 home 中再加一个 post 方法
1 2 3 4 5 6 7 8 9 10 11 12 13 14 15 16 17 18 19 const Controller = require ('egg' ).Controller ;class HomeController extends Controller { async index ( const { ctx } = this ; const {params} = ctx; console .log (params); ctx.body = 'hi, egg' ; } async post ( const { ctx } = this ; const { request : { body } } = ctx; console .log (body); ctx.body = 'hi, post' ; } } module .exports = HomeController ;
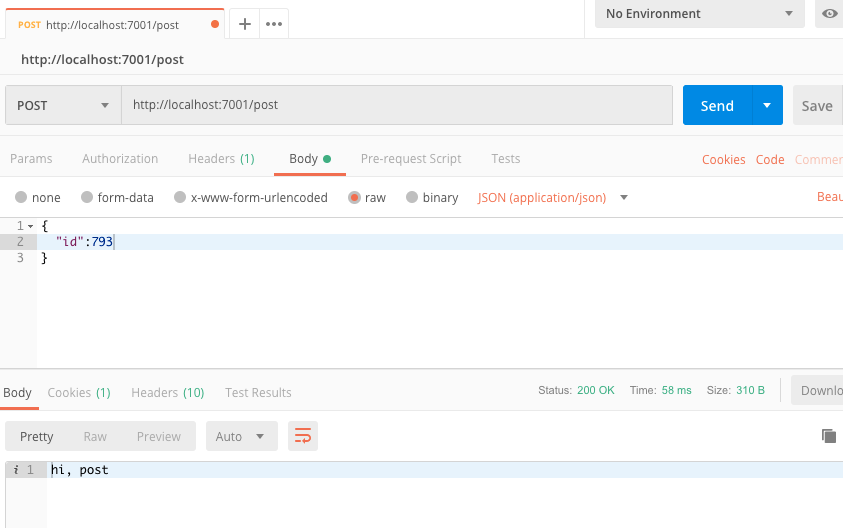
然后使用 postman 进行测试下:
接口成功返回了 “hi, post” ,控制台也成功打印了入参,控制台我就不贴图了。
如何发送请求 使用API: ctx.curl
做中间层肯定要向真实的业务服务去发起请求,拿到数据后进行重组然后返回给客户端。根据 egg 的目录约定 app 目录下还可以存在 service 层,那我们的业务内容就写在 service 中,在 app 下新建一个 service 文件夹,在 service 下再新建一个 home.js 文件,此时 app 下文件结构如下:
1
2
3
4
5
6
├── app │ ├── controller │ │ └── home.js │ ├── service │ │ └── home.js │ └── router.js
home.js 内代码如下:
1
2
3
4
5
6
7
8
const Service = require ('egg' ).Service ;class HomeService extends Service { async post ( return 'service 成功返回' } } module .exports = HomeService ;
然后在 controller 内的进行调用 service :
1 2 3 4 5 6 7 8 9 10 11 12 13 14 15 const Controller = require ('egg' ).Controller ;class HomeController extends Controller { async post ( const { ctx } = this ; const { request : { body } } = ctx; console .log (body); const res = await ctx.service .home .post (); console .log (res); ctx.body = 'hi, post' ; } } module .exports = HomeController ;
访问之后控制台成功输出 service 成功返回 说明 service 调用成功了,之后我们就可以在 service 中请求接口了
1
2
3
4
5
6
7
8
9
const Service = require ('egg' ).Service ;class HomeService extends Service { async post ( const {data} = await this .ctx .curl ('https://api.weixin.qq.com/cgi-bin/ticket/getticket' , {data : {'随便输的' ,type : 'jsapi' }, dataType : 'json' }); return Promise .resolve (data); } } module .exports = HomeService ;
上面的代码我们请求了一个腾讯的接口,参数是随便传的。由上方的接口可以看到发送请求我们用的是 ctx.curl API,给这个API 传了两个参数,第一个是请求地址,第二个里面有传递的参数等,我们要熟悉的也就是第二个参数都可以传什么,这里我给出常用的参数,完整参数可以看 官方文档
参数
类型
说明
method
String
请求方法,默认 GET 支持 GET、POST、PUT、DELETE、PATCH 等
data
Object
传参,GET POST 方法都通过这个字段传参
dataType
String
响应格式;默认直接返回 buffer ,支持 text 和 json 两种格式。
contentType
String
请求数据格式,默认是 undefined,HttpClient 会自动根据 data 和 content 参数自动设置。 data 是 object 的时候默认设置的是 form。支持 json 格式。
headers
Object
自定义请求头
参考文档:
官方文档: HttpClient
如何解决跨域(中间件方案) 给 Web 来用,肯定要涉及到跨域,同时 egg 也支持中间件,所以这里我们就写一个中间件,学习下 egg 的中间件,再解决个跨域。
egg 是基于 koa 实现的,egg 的中间件看形式其实就是给 koa 的中间件包了一层,所以我们先写个 koa 的跨域中间件:
1
2
3
4
5
6
7
8
9
10
11
12
13
14
15
16
17
18
19
20
21
22
23
24
25
26
27
const cors = async (ctx, next ) => { await next () ctx.set ("Access-Control-Allow-Origin" , "*" ); ctx.set ("Access-Control-Allow-Methods" , "OPTIONS,POST,GET,HEAD,DELETE,PUT" ); ctx.set ("Access-Control-Allow-Headers" , "x-requested-with, accept, origin, content-type, token" ); ctx.set ("Content-Type" , "application/json;charset=utf-8" ); ctx.set ("Access-Control-Max-Age" , 300 ); ctx.set ("Access-Control-Allow-Credentials" , true ); ctx.set ("Access-Control-Expose-Headers" , "myData" ); if (ctx.request .method === "OPTIONS" ) { ctx.response .status = 204 } }
koa 的中间件就是这个样子,egg 的中间件要的其实也是一个函数,然后这个函数把 koa 的中间件返回即可,同时这个函数接收两个参数,一个插件配置 options,一个应用实例 app,所以对上方的代码改造下:
1
2
3
4
5
6
7
8
9
10
11
12
13
14
15
16
17
18
19
20
21
22
23
const cors = async (ctx, next ) => { await next () ctx.set ("Access-Control-Allow-Origin" , "*" ); ctx.set ("Access-Control-Allow-Methods" , "OPTIONS,POST,GET,HEAD,DELETE,PUT" ); ctx.set ("Access-Control-Allow-Headers" , "x-requested-with, accept, origin, content-type, token" ); ctx.set ("Content-Type" , "application/json;charset=utf-8" ); ctx.set ("Access-Control-Max-Age" , 300 ); ctx.set ("Access-Control-Allow-Credentials" , true ); ctx.set ("Access-Control-Expose-Headers" , "myData" ); if (ctx.request .method === "OPTIONS" ) { ctx.response .status = 204 } } module .exports = (options,app ) => { return cors; }
egg 的中间件我们写完了,然后就需要去挂载到应用上,中间件的配置在 /config/config.default.js 中:
1
2
3
4
5
6
7
8
9
10
11
12
13
14
15
16
17
18
19
20
21
22
23
'use strict' ;module .exports = appInfo => const config = exports = {}; config.keys = appInfo.name + '_1586250824909_3576' ; config.middleware = []; const userConfig = {}; return { ...config, ...userConfig, security : { csrf : { enable : false , }, }, middleware : [ 'cors' ], cors :{}, }; };
如何输出接口文档 接口写完后必然是要提供给客户端来使用的,那么关于入参出参请求方式必须要有详细的接口文档,并且及时进行更新,如果单独去写接口文档是需要耗费相当大的精力的,所以更希望的是可以基于注释来自动生成接口文档,这里可以用 swagger 和 apidoc ,最后我选择使用 apidoc ,原因是 swagger 在 node 中使用比较麻烦,还需要接入部分配置,完成 swagger 在 node 中使用,赶上我搭一个小型项目了,最重要 swagger 的界面也不好看,所以最后我选择了 apidoc 。
首先在项目中安装 apidoc :
然后在项目 package.json 中添加 apidoc 字段,进行配置 apidoc
1
2
3
4
5
6
7
"apidoc" : { "title" : "胖大人笔记接口文档" , "url" : "https://notes.jindll.com" , "template" : { "forceLanguage" : "zh_cn" } }
title 是页面的 title ,url 是接口前缀,会拼在示例接口前,template 是关于接口模版的配置,forceLanguage 指定页面语言,更多的 apidoc 相关内容,之后会专门出一篇文章,或者也可以看官方文档:https://apidocjs.com/
然后在 contriller 中根据 apidoc 要求写注释,以下是示例:
1 2 3 4 5 6 7 8 9 10 11 12 13 14 15 16 17 18 19 20 21 22 23 24 25 26 27 28 29 30 31 32 33 34 35 36 37 38 39 40 41 const Controller = require ('egg' ).Controller ;class HomeController extends Controller { async post ( const { ctx } = this ; ctx.body = 'hi, post' ; } } module .exports = HomeController ;
注释写完了,然后我们再在项目 package.json 中添加一个 docs 命令,用来生成文档:
1
2
3
"script" : { "docs" : "npx apidoc -i ./app/controller/ -o app/public/docs" }
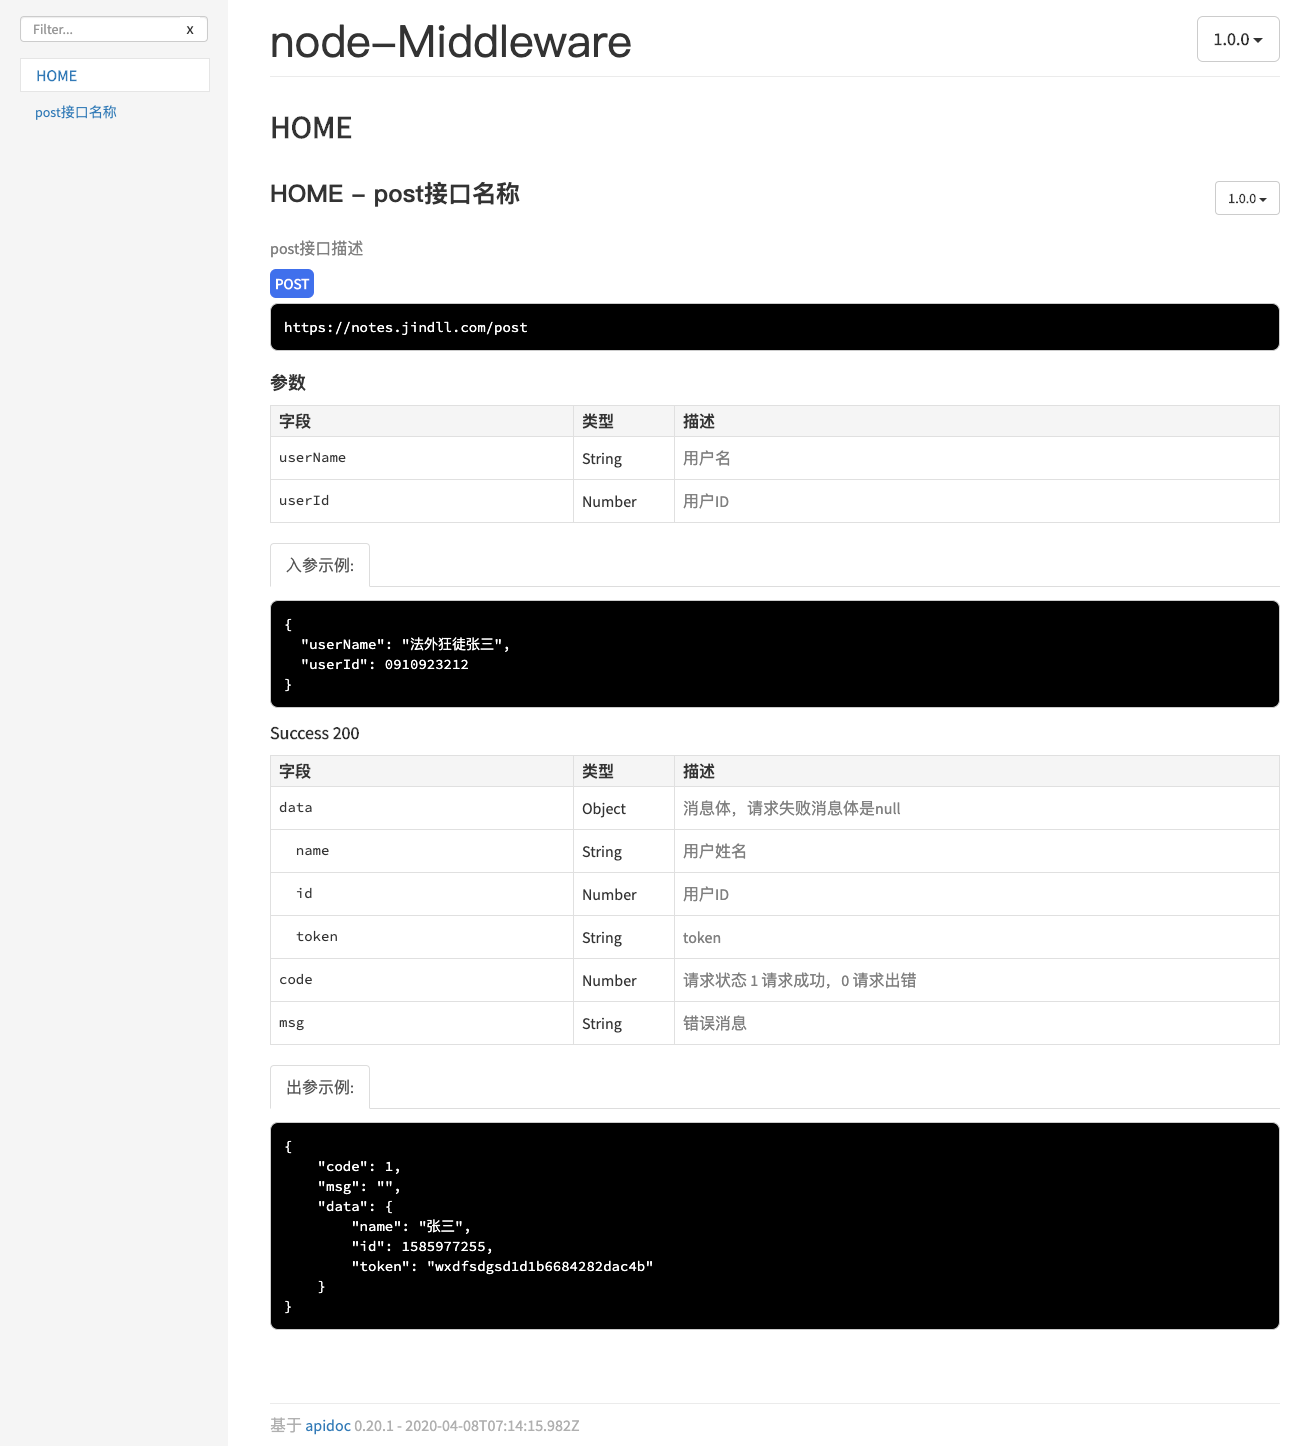
配置完成之后,我们 npm run docs 运行一下,然后会在 app/public/docs 生成接口文档,重新运行项目,访问 http://127.0.0.1:7001/public/docs/index.html 就可以看输出的接口文档了
根据截图我们再回头解释下上面的注释都是什么意思
注释
说明
@api {POST} /post post接口名称{POST} 请求方式,即上方页面的蓝色标签/post 即蓝色标签下面的完整接口地址,前方的域名来源于 package.json 文件 apidoc.urlpost接口名称 即显示在页面侧栏的接口名称和HOME - post接口名称
@apiDescription post接口描述即对应页面上的接口描述
@apiVersion 1.0.0接口版本号
@apiName /post接口名称,与版本配合使用,可以定义同样的名称不同的版本进行对比
@apiParam {String} userName 用户名{String} 数据类型userName 入参名称用户名 对于字段的说明
@apiParamExample {json} 入参示例:入参示例,JSON 格式
@apiSuccess {Object} data 消息体,请求失败消息体是null接口返回说明,参考Success 200表格{Object} 数据类型data 出参字段消息体,请求失败消息体是null 字段说明
@apiSuccessExample {json} 出参示例:出参示例,JSON 格式
参考文档:
官方文档:https://apidocjs.com/
如何获取上传的文件 框架默认的文件上传模式是 stream 模式,可以在 Controller 中通过 ctx.getFileStream 获取到上传的文件流,然后将流写入文件,或者传到OSS:
1 2 3 4 5 6 7 8 9 10 11 12 13 const Controller = require ('egg' ).Controller ;class HomeController extends Controller { async post ( const { ctx } = this ; const fileStream = await ctx.getFileStream (); console .log (fileStream); ctx.body = 'hi, post' ; } } module .exports = HomeController ;
如果对文件流不熟悉,框架还提供了一个 file 模式,首先在 config 中配置成 file 模式,然后再修改下允许上传的文件大小:
1 2 3 4 5 6 7 8 9 10 11 12 13 14 15 16 17 18 19 20 'use strict' ;module .exports = appInfo => const config = exports = {}; config.keys = appInfo.name + '_1586250824909_3576' ; config.middleware = []; const userConfig = {}; return { ...config, ...userConfig, multipart : { mode : 'file' , fileSize : '1024mb' }, }; };
然后在 Controller 中通过 ctx.request.files 可以拿到上传的文件列表:
1 2 3 4 5 6 7 8 9 10 11 12 13 const Controller = require ('egg' ).Controller ;class HomeController extends Controller { async post ( const { ctx } = this ; const file = ctx.request .files [0 ]; console .log (file); ctx.body = 'hi, post' ; } } module .exports = HomeController ;
但是当你上传 .doc 等后缀的文件会报错,这是由于框架默认只允许以下类型文件上传:
1
2
3
4
5
6
7
8
9
10
11
12
13
14
15
16
17
18
19
20
21
22
23
// images '.jpg', '.jpeg', // image/jpeg '.png', // image/png, image/x-png '.gif', // image/gif '.bmp', // image/bmp '.wbmp', // image/vnd.wap.wbmp '.webp', '.tif', '.psd', // text '.svg', '.js', '.jsx', '.json', '.css', '.less', '.html', '.htm', '.xml', // tar '.zip', '.gz', '.tgz', '.gzip', // video '.mp3', '.mp4', '.avi',
所以我们就需要在 config 中扩展下允许上传的文件类型:
1 2 3 4 5 6 7 8 9 10 11 12 13 14 15 16 17 18 19 20 21 'use strict' ;module .exports = appInfo => const config = exports = {}; config.keys = appInfo.name + '_1586250824909_3576' ; config.middleware = []; const userConfig = {}; return { ...config, ...userConfig, multipart : { mode : 'file' , fileSize : '1024mb' , fileExtensions : [ '.exe' , '.zip' ] }, }; };
配置完成重启下服务。
参考文档:
官方文档:https://eggjs.org/zh-cn/basics/controller.html
如何转发请求 做中间层,大部分接口我们可能都是直接转发到真实的接口,不需要做二次过滤,所以我们就需要对某一类的接口进行直接转发,这里直接可以使用个插件 egg-proxy ,项目中 npm i egg-proxy ,然后在配置中启用插件:
1 2 3 4 5 6 'use strict' ;exports .proxy = { enable : true , package : 'egg-proxy' , };
1 2 3 4 5 6 7 8 9 10 11 12 13 14 15 16 17 18 19 20 21 22 23 24 25 'use strict' ;module .exports = appInfo => const config = exports = {}; config.keys = appInfo.name + '_1586250824909_3576' ; config.middleware = []; const userConfig = {}; return { ...config, ...userConfig, proxy : { host : 'https://www.baidu.com' , match : /^(\/api)/ , map (path ) { const finalPath = path.replace (/^(\/api)/ , '' ); return finalPath; }, }, }; };
转发请求也配置完成了

